Beauty

[Review] M.N Me Now Generation Long Lasting Lip Gloss

Hi everyone!

This week I’m reviewing the M.N Me Now Generation Long Lasting Lip Glosses* , obtained from Born Pretty Store. If you haven’t heard of them before, they are like the beauty equivalent of eBay and stock everything from makeup, jewelry and makeup holders to stationery, clothing and mobile phone accessories. I was contacted by the store to review some of their products and had the hardest time choosing what I wanted! Everything looked so good and the price tags were amazing 🙂 I do love my higher end brands for makeup but don’t mind trying out drugstore brands which are often just as good.

Two of the products I chose as part of my order were the liquid lip glosses. Although they are called lip glosses, they dry to a matte finish and are essentially liquid lipsticks. I picked up two shades, #3 and #36 which retail for around $2 each.

M.N ME NOW GENERATION-II “LONG LASTING LIP GLOSS”

M.N ME NOW GENERATION-II “LONG LASTING LIP GLOSS”

M.N ME NOW GENERATION-II “LONG LASTING LIP GLOSS”

M.N ME NOW GENERATION-II “LONG LASTING LIP GLOSS” : Shade 36 (top) and Shade 3 (bottom)

Shipping from Born Pretty Store is free (yay!) and my order reached me in just under two weeks. I wasn’t expecting a lot from a $2 lip gloss but these were surprisingly good! As with all liquid lipsticks, you need to prep your lips and make sure that there are no flakes. I usually apply a thick layer of lip balm to get my lips smooth, wipe the balm off then apply liquid or matte lipsticks.

Both liquids were easy to apply, I applied one layer and then waited a few minutes for it to dry. Once they were set, they stayed in place through the day, even through eating and drinking. They are slightly drying (as are all liquid lipsticks!), but I didn’t notice any flaking through the day. Shade 36 (the fuschia pink shade) was a lot more comfortable to wear than shade 3, it wasn’t as thick and was very pigmented.

The only negative point about this product is that they remained tacky through the day, you can’t smack your lips together or it will totally kill the matte finish and feel terrible.

Swatches: M.N ME NOW GENERATION-II “LONG LASTING LIP GLOSS” : Shade 36

Swatches: M.N ME NOW GENERATION-II “LONG LASTING LIP GLOSS” : Shade 36

Swatches: M.N ME NOW GENERATION-II “LONG LASTING LIP GLOSS” : Shade 36

Swatches: M.N ME NOW GENERATION-II “LONG LASTING LIP GLOSS” : Shade 36

M.N ME NOW GENERATION-II “LONG LASTING LIP GLOSS” : Shade 3

M.N ME NOW GENERATION-II “LONG LASTING LIP GLOSS” : Shade 3

Swatches: M.N ME NOW GENERATION-II “LONG LASTING LIP GLOSS” : Shade 3

Swatches: M.N ME NOW GENERATION-II “LONG LASTING LIP GLOSS” : Shade 3

Swatches: M.N ME NOW GENERATION-II “LONG LASTING LIP GLOSS”

Swatches: M.N ME NOW GENERATION-II “LONG LASTING LIP GLOSS”

Overall, I think that these are good value for value. They’re not as good as my Sephora liquid lipsticks, but they do the job. For $2, you get to choose from 36 colors and you’re getting a long lasting lippy with good pigmentation. I would suggest buying a few and trying them first to see if you like them. Another thing to note is that all shades are not created equally. The pigmentation, finish and comfort vary depending on the shade.

Hope you guys enjoyed the review 🙂 You can purchase these lipsticks from Born Pretty Store for $2 with free worldwide shipping. You can also use a 10% off coupon code PADG10 which will work on all full priced items.

Thanks for reading and hope everyone is having an amazing weekend ♥

Instagram // Bloglovin // Pinterest

*Product featured in this post was kindly provided for consideration. As with all my posts, the review is 100% honest and of my own personal opinion. For more information, visit my disclosure policy.

[Mini Review] Benefit They’re Real Liner & Mascara

Hi everyone,

When I first started blogging two years ago, the Benefit They’re Real mascara was EVERYWHERE. I was dying to try it but $36 was more than what I was used to paying for a mascara. Lucky for me, I was able to get samples of both the push up liner and the mascara.

Benefit They're Real review

Benefit They’re Real review

Benefit They’re Real mascara

What Benefit say:

They’re real! lengthens, curls, volumizes, lifts & separates. Our jet black, long-wearing formula won’t smudge or dry out. A specially designed brush reveals lashes you never knew you had!

There’s already thousands of reviews of this mascara but I thought that I’d throw in my two cents anyway. I was expecting a lot from this mascara, it’s considered somewhat of a cult product and is one of Benefit’s bestsellers. Here’s a quick run down of what I liked and didn’t like:

Pros

  • The wand does a great job of separating the lashes. It also gave my lashes awesome length. The little ball on the end helps get to the lashes right in the corners and is good for bottom lashes.
  • Very pigmented formula – gave me dark lashes
  • Easy to apply, did not end up going on my eye lids or smudging through the day

Cons

  • The wand takes some getting used to! It actually hurts using it for the first few times
  • The effort it takes (and the eye lashes I lose) removing this mascara
  • Gives “crispy” eye lashes which can sometimes flake at the end of the day

Overall, this is a good mascara but I’ve tried mascaras that are A LOT better from Covergirl and Maybelline. I like massive, thick lashes with lots of volumes but I didn’t really get the wow effect I was hoping for from this mascara.

Benefit They're Real mascara wand

Benefit They’re Real mascara wand

Benefit They're Real Push Up Liner

Benefit They’re Real Push Up Liner

Benefit They’re Real liner

I don’t have a lot to say on the liner, it was crumbly and I found it extremely difficult to squeeze the product out of the tube. I ended up having to throw out the product without using it, not sure if this was due to the product being a sample size? Would love to know if anyone else had a different experience!

I love Benefit Cosmetics in general, and REALLY REALLY wanted to love these products but these two just did not agree with me. If you’ve tried these products, would love to know your thoughts!

Until next time 🙂

Fatima

Instagram // Bloglovin // Pinterest

[Review] MAC Ruby Woo

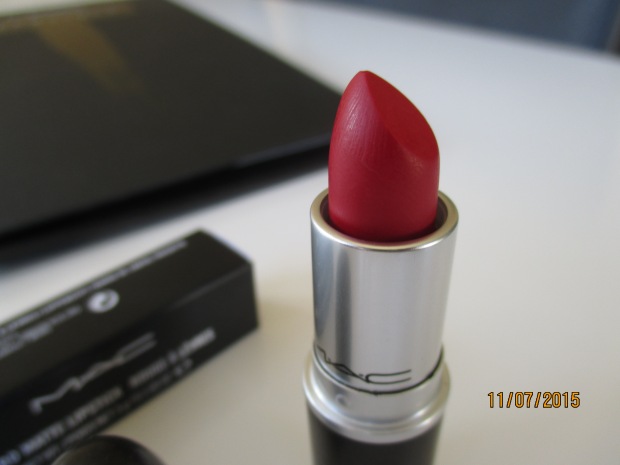
Hi everyone! I’m reviewing Ruby Woo by MAC today, a lipstick which doesn’t need an introduction because of it’s popularity in the beauty community. This is the red lipstick of all red lipsticks, I’ve heard it being described as a classic, a cult favorite, and the “red lipstick every woman needs to own”.

I was a bit undecided about buying this lipstick, because I don’t wear red lipstick that often. Did I really need to buy MAC if I was only going to wear it a few times in a year? I was also a little hesitant to buy it because there are a lot of reviews out there which talk about how drying this lipstick is.

Anyway I tested this out in David Jones, loved how it looked on and bought it immediately. Ladies, Ruby Woo is worth the hype ♥ I am in love with this lipstick, read on for my review.

MAC Ruby Woo: Very matte vivid blue red

MAC Ruby Woo: Very matte vivid blue red

MAC Ruby Woo review

IMG_0035

MAC describe Ruby Woo as a “very matte vivid blue red”. Ruby Woo is available in a retro matte finish, which makes it dry but also very long lasting. I usually apply lip balm before I do my base and eyes, then wipe the lip balm off and apply Ruby Woo to my prepped lips. The lipstick can drag if lips are not sufficiently moisturized before so it’s important to exfoliate and prep those lips!

The color of this lipstick is gorgeous, it’s bright and has the right tones which makes it wearable for all skin colors and undertones. It’s very pigmented, with one swipe giving enough coverage. I love how long lasting this lipstick is, it lasts a good 5-7 hours with eating and drinking and requires no touch ups. It also feels super comfortable on my lips once it’s applied, it doesn’t feel too drying and I haven’t noticed any flaking.

Swatched: MAC Ruby Woo on NC 42 skin

Swatched: MAC Ruby Woo on NC 42 skin

Overall, this lipstick is pretty amazing and I would definitely recommend it if you don’t already own it! It’s the kind of red lipstick that makes you feel powerful, strong and gorgeous. And who doesn’t want to feel like that? 🙂

What is your favorite red lipstick? x

[Review] L.A Girl Pro Conceal HD High Definition Concealer & Corrector

Hello everyone! Way back in the day, I did a haul from the online site Cherry Culture which included two L.A girl pro conceal concealers. I’m one of those people that never understood the huge deal with concealers, I usually have enough time in the mornings for just foundation and that’s it. Anyway a few months back my the bags under my eyes were looking REALLY dark due to lack of sleep, exams and my work schedule. I remembered I had these, and took them out for a test.

Review L.A. Girl PRO Conceal HD Concealers

Review L.A. Girl PRO Conceal HD Concealers

From left to right: L.A. Girl PRO Corrector in Orange and L.A Girl Pro Conceal HD High Definition Concealers in Warm Honey and Fawn

From left to right: L.A. Girl PRO Corrector in Orange and L.A Girl Pro Conceal HD High Definition Concealers in Warm Honey and Fawn

From left to right: L.A. Girl PRO Corrector in Orange and L.A Girl Pro Conceal HD High Definition Concealers in Warm Honey and Fawn

From left to right: L.A. Girl PRO Corrector in Orange and L.A Girl Pro Conceal HD High Definition Concealers in Warm Honey and Fawn

I picked up two shades with my haul, Warm Honey (GC982) and Fawn (GC983). For reference I have Indian skin and am around a NC 42 in MAC and shade 4W2 in Estee Lauder. I chose my shades based on swatches online- there are plenty of blog posts and Youtube videos which swatch the entire collection. The first thing that you’ll notice about this product is the price , I paid around $3 each for mine which is why I didn’t hesitate to pick up two. It’s super affordable so you really can’t go wrong with this product.

Back to my review, I absolutely love these concealers and there really isn’t anything bad that I can say about the product. It comes in a squeeze tube with a brush tip which makes dispensing it super easy, although I tend to apply on my finger and then to my face. The texture of the concealers are creamy and thick, and provide excellent coverage for under eye circles. Best of all, it stays on my face ALL DAY LONG. Which is definitely what I look for in a product! I apply my foundation first, and then the concealer on top. I apply only a tiny amount though, because it can crease if you apply too much. Finally, I set the concealer with my Studio Fix powder. Both colors I chose are a good match for my skin, although I like Warm Honey a bit more. I’ve also used this on normal blemishes but didn’t find that it worked as well, maybe because it’s such a creamy product.

I own the MAC pro longwear concealer and prefer these L.A Girl ones, so this is a great dupe if you’re already using the MAC one 🙂

Swatches from left to right: L.A. Girl PRO Corrector in Orange and L.A Girl Pro Conceal HD High Definition Concealers in Fawn and Warm Honey

Swatches from left to right: L.A. Girl PRO Corrector in Orange and L.A Girl Pro Conceal HD High Definition Concealers in Fawn and Warm Honey

L.A. Girl PRO Corrector in Orange

L.A. Girl PRO Corrector in Orange


Next up is the L.A Girl Pro Conceal Corrector in Orange. Correctors are basically meant to “color correct” certain areas that you want to disguise. For example, salmon, peach and orange correctors can be used to correct under eye circles while green correctors are used to correct redness in the skin. I read a lot of blog posts saying that orange is great for darker skin tones, and was really curious so I picked this one up from eBay for around $5.

The corrector has the same creamy consistency as the concealers, and is SUPER DARK! The first time I applied too much and just had huge orange circles around my eyes. The next time I was careful and only applied the tiniest amount. Even then, because the product is so pigmented, it still peeked through the concealer and foundation on top. You really have to blend and it takes time to apply this. I would recommend this for darker skinned beauties or else it will be impossible to conceal.

Overall, I highly recommend the concealers and look forward to buying more colors in the range. I’ve also heard that they’re great for contouring so will also be picking up a darker shade next time. I might give the orange corrector a miss the next time, although it was a good experiment!

Do you color correct or conceal on a regular basis? Would love to hear your favourite products!

Thank you for reading 🙂 Don’t forget to follow my new Instagram for my blog! You can also head over to Fabulous and Fun Life where I will be linking this post for the Monday Makeup Madness Party.

Fatima x

[Review] MAC Studio Fix Foundation in NC 44

review MAC studio fix foundation NC 44

Foundation is one of those items that make or break your entire look in my opinion. Last year I ran out of my holy grail Estee Lauder Double Wear foundation and had to go hunting for another foundation. I couldn’t repurchase the ELDW because they don’t stock my shade in Australia, and none of the other shades in the range worked for me. I ended up getting samples across a few brands from Myer – the Lancome Teint Idole and Chanel perfection foundation were two brands that I enjoyed but the shades were not a perfect match for my skin. This was around the same time that I had my makeup done at MAC, I ended up selecting the Studio Fix foundation in NC 44 to redeem as one of my products.

Product description from the MAC website:

A modern foundation that combines a natural matte finish and medium-buildable coverage with broad spectrum UVA/UVB SPF 15. Comfortable and long-wearing: lasts for up to eight hours. Applies smoothly, builds coverage quickly and easily. Contains specially treated micronized pigments and soft-focus powders for a super-smooth look that helps minimize the appearance of imperfections. Absorbs and disperses oil. Contains special skin-conditioning ingredients. Oil free.

review mac studio fix foundation NC 44
20140913_144652
The formula

MAC Studio Fix is a liquid foundation and has a thick consistency. It smells a bit of paint, which is weird but is something that I can overlook. The formula of the foundation is easy to work with, it applies evenly and I have enough time to blend it before it dries. I apply this with my Real Techniques Expert face brush and the formula seems to work well with my normal/dry skin.

The coverage

The coverage of this foundation is awesome, I would say that it’s medium to high. You can build your coverage with studio fix- it doesn’t looked caked on, gives an absolutely flawless finish and photographs really well. The finish of this foundation is more dewy than matte, I really love how it makes my skin look.

Longevity

Here’s where the foundation failed me, it doesn’t seem to last more than 5 hours. I’m used to wearing the ELDW which requires no touch ups through out the day, so I was disappointed to see that around 2 pm it looked liked I had no foundation on.

Packaging

The foundation is housed in an attractive glass bottle. The pump for the bottle has to be purchased separately.

Overall thoughts

This foundation is good, I love the huge color selection and how it makes my skin look. It’s not the best foundation out there that I’ve used however, I don’t like the staying power of Studio Fix and also dislike that it doesn’t come with a pump included. This is a foundation that I would reach for if I’m only going out for a few hours, not at all day event or for work.

If you’re interested in trying this foundation, I suggest getting a sample from MAC first. I like using this foundation but it’s not something that I really really LOVE or want to rave on about on this blog.

The MAC Studio Fix Foundation retails for $49 (30ml) and is available from Myer, David Jones and the MAC online store.

Have you used MAC foundation before? What is your holy grail foundation? Share your thoughts in the comments below! x

EDIT : This post has been linked to the Monday Makeup Madness party over at Fabulous and Fun Life. Head over to join in on the fun!

[Review] Estee Lauder Sumptuous Extreme Lash Multiplying Volume Mascara

Hi lovelies! At the beginning of the year, I picked up an Estee Lauder eye set from South Africa which included the Sumptuous Extreme Lash Multiplying Mascara. I’ve been using this mascara for a few months now but never got down to posting a review because I could not for the life of me get a decent close up before/after picture showing how the mascara worked for me.

Anyway 🙂 It recently came to my attention (thanks Beauty Heaven!) that the September 2015 20th anniversary issue of Marie Claire magazine includes a Full-sized Sumptuous Extreme Mascara in Extreme Black, RRP$52. Read on to find out my thoughts on this mascara!

Sumptuous Extreme Lash Multiplying Volume Mascara

Sumptuous Extreme
Lash Multiplying Volume Mascara

Sumptuous Extreme Lash Multiplying Volume Mascara

Description from the EL website:
LASHES SEEM TO MULTIPLY, MAGNIFY, GROW TO EXTREMES.

Product description from the Estee Lauder website:

Lashes seem to multiply, magnify, grow to extremes.

Sumptuous Extreme creates outrageous volume, lift and curves for an audacious, false-lash effect. Eyes look brighter, wider, more seductive.

Extreme Bold Volume™ formula is a blend of three high-volume fibers in a mousse-light base. The formula acts almost like lash extensions, multiplying and growing the look of lashes. Fortified with conditioning Lash-Advancing Vitamin Complex.

The BrushComber Extreme™ has two types of bristles: flexible fibers to carry maximum formula; solid fibers to comb and separate for clump-free definition.

Packaging & price

Gold luxe packaging? Yes please! The packaging of this mascara screams luxury and class, it’s so beautiful and really stands out in my collection with it’s shiny finish and gorgeous metal. This is my first high end mascara purchased, my favorite mascara’s are usually the Maybelline and Covergirl ones which I pick up at 50% off for around $10. I bought this mascara without reading any reviews on first, because I love the EL double wear foundation and wanted to try more of their products.

Performance

I found the wand of this mascara to be HUGE, it took some time to get used to and even after using it for a few months, I still end up with mascara going on my eye lid sometimes. That being said, the massive wand is what gives the amazing results. This mascara gives me very black, long and voluminous lashes. The mascara can make my lashes stick together if applied incorrectly, I found that the best way to apply it is slowly and building layer by layer. The product applies wet and then dries after a few minutes. It lasts all day on me without smudging and also holds the curl and volume throughout the day. It’s also not a pain to remove like other mascara’s I’ve used in the past, which is a huge plus for me.

So how does a $52 mascara compare to a $10 one? It’s been wonderful using this mascara, and definitely feels like I’m using a higher end and more expensive product. In terms of performance, yes it’s better than other mascara’s I’ve used in the past but only by a tiny bit. It was an amazing experience using a higher end mascara but at the end of the day, my Maybelline mascara performs almost as good. While I loved using this mascara, I don’t think I’ll ever pay $52 for it. I’d rather spend that amount of money on the EL Double Wear foundation which is my holy grail 🙂

Brush details from the EL website: OVERSIZED BRUSHCOMBER EXTREME™ THICKENS LIKE A BRUSH. DEFINES AND SEPARATES LIKE A COMB.

Brush details from the EL website: OVERSIZED BRUSHCOMBER EXTREME™ THICKENS LIKE A BRUSH. DEFINES AND SEPARATES LIKE A COMB.

20150614_105145

Final thoughts

Overall verdict? Buy the magazine for the mascara! It’s not everyday that you get to buy a higher end mascara for $10 (that’s how I look at it) and after that, you can decide if you want to repurchase! I was super excited when I saw this offer on Beauty Heaven and even more ecstatic my friend surprised me by buying the magazine for me the next day.

Will you be trying this mascara? What’s the best mascara that you’ve used? x

[Review] Hair & Me Hair Rejuvenation Treatment

Hi everyone! A few weeks back, I decided to take the plunge and ombre my hair at home using the L’Oreal Preference Wild Ombre kit (reviewed here). The results were gorgeous but it left my hair even more damaged and dry than it already was. My Hair & Me Hair Rejuvenation Treatment* came at the perfect time and I couldn’t wait for it to work it’s wonders on my hair.

A little background on the company, Hair & Me is an Australian company that offer a range of products from a Hair Rejuvenation Treatment, through to a Strength Shampoo & Conditioner as well as Detangling Brush. All of Hair&Me’s products are vegan friendly, and none of their products are tested on animals.

Hair & Me Hair Rejuvenation Treatment review

Hair & Me Hair Rejuvenation Treatment

Product Description

Hair&Me is an 100% organic, natural hair treatment designed to repair, moisturise & strengthen your hair and scalp, stimulate hair growth, prevent split ends and breakage, control frizziness and help cut blow drying time by 30-50%.

Please Note – This is an oil based treatment using a select number of oils designed to help rejuvenate and restore hair.

INGREDIENTS – 100% Certified Organic
ALLERGEN INFORMATION – Contains Nuts & or Nut products

  • Extra Virgin Coconut Oil
  • Jojoba Oil
  • Macadamia Virgin Oil
  • Sweet Almond Oil
Hair & Me Hair Rejuvenation Treatment review

Hair Rejuvenation Treatment: an oil based product, using coconut, macadamia, jojoba & almond oil – designed to help repair, moisturise & strengthen your hair & scalp

Directions for use

The Hair Rejuvenation Treatment is a pre-shampoo which nourishes and protects hair . The instructions on the back of the treatment ask you to apply it to damp hair, starting from roots, and ensuring a good coverage from root to tip. The recommended time to leave in the treatment is from thirty minutes or even overnight, and then removing the treatment by shampooing and conditioning as usual.

My review

I popped the treatment in the fridge for around thirty minutes and then wet my hair in my bathroom sink. The treatment was hard when I took it out of the fridge, but turned creamy and soft once squeezed out. I absolutely LOVE the smell of this treatment, it smells of coconut and desserts and reminds me of summer days on the beach. I also adore the hot pink bag, and the fact that it has a screw on cap to store it easily between treatments.

I worked the treatment in my hair and put my hair up in a messy bun for around two hours then hit the shower. Even though I did a double shampoo, I wasn’t able to get all the oil out and had to take a second shower the next morning.

GUYS THE RESULTS!

This treatment made my hair super soft and silky, honestly even with the ombre it felt a whole lot better than it did before. My hair has also been falling less, feels hydrated and even looks healthier. To be honest I wasn’t expecting to see any results after just one treatment but I’m super thrilled with the results and can’t wait to use the rest of the bag.

Overall thoughts

This product has been a life saver for my damaged and dry hair and I’ll definitely be repurchasing it once I run out. The treatment sells for $20, I expect to get another two uses from my bag so I would say that it’s definitely good value for money considering the price of salon treatments. My treatment also reached me within two days of it being shipped, so I’ve been impressed with the product and company from start to finish.

Hair & Me products can be purchased from their website www.hairandme.com.au. You can also find them on Instagram: @hairandme_, Twitter: @hairandme and Facebook: http://www.facebook.com/hairandme.

*Product featured in this post was kindly provided. As with all my posts, it is 100% honest and of my own personal opinion. For more information, visit my disclosure policy.

[Review] MAC Modesty Lipstick

MAC Modesty (Cremesheen)

MAC Modesty (Cremesheen)

Hi everyone! I picked this MAC lipstick up way back in January when I was overseas, but only used it for the first time in May because I wanted to take pictures of the unused bullet first. Hashtag beauty blogger problems (:

This product hit my wishlist last year when one of my favourite bloggers (Zara from Mouldyfruit) kept mentioning her love for it. I already own one nude lipstick from MAC (Hug Me) which I love so was eager to try a second nude lipstick from them.

MAC modesty:

MAC modesty

MAC Modesty swatched on NC 42 skin

MAC Modesty swatched on NC 42 skin

MAC Modesty

Swatches: MAC Modesty

MAC describe Modesty as a “muted neutral pink” and I have to agree – it’s not too pink but also not too nude. It has just enough of a neutral tone to make it a good MLBB (my lips but better) shade. I think this lipstick will suit almost every skin tone because it’s one of those can’t go wrong shades.

MAC Modesty is available in a cremesheen formula which makes it a very creamy, hydrating and comfortable lipstick to wear. I love how low maintenance it is, it’s perfect for everyday wear and is also my most reached for shade at the moment for the office.  The pigmentation is really good, with one swipe giving enough coverage. I’m not such a big fan of the staying power though- it tends to fade after a few hours and is pretty much non existent once I drink coffee or have something to eat.

If you’re after a MAC nude lipstick, give this one a swatch when you’re at the MAC counter next. What’s your perfect nude lipstick? x

EDIT: This post has been added to the Monday Makeup Madness link party over at Fabulous and Fun Life. Head over to join in on the fun!

[Review] Sleek Makeup Bronze Block

Sleek Makeup Bronze Block Dark

Sleek Makeup Bronze Block Dark

Ingredients Sleek Makeup Bronze Block

Ingredients Sleek Makeup Bronze Block

I was first introduced to Sleek Makeup last year when I came across their contour kit and their rose gold blush which was often referred to as a dupe of the famous Nars Orgasm blush. I purchased both products, fell in love with them (read about it here) and haven’t looked back.

I absolutely LOVE Sleek Makeup packaging, all their products come in sturdy matte black cases with mirrors included. I actually prefer their packaging to higher end brands like MAC, it looks so expensive and classy for a drugstore product.

The Sleek Bronze Block is available in two shades, light and dark. I picked up the dark option, which consists of four complementary shades of blush and bronzer that can be used individually or together.

Here’s what Sleek Makeup have to say about the bronze block:

Get that sun-kissed glow all year-round! This highly versatile bronzer combines four complementary shades for a swirl that gives you a natural radiant complexion.

  • The darker shades can be used alone to enhance a tan, while the lighter shades alone can naturally illuminate skin

  • The subtle shimmer particles and the beautiful pink hue add a refreshed glow to the skin

  • Long-lasting velvety smooth texture

  • Blends effortlessly on all skin tones

Sleek Makeup Bronze Block

Sleek Makeup Bronze Block

Swatch Sleek Makeup Bronze Block

Finger swatch of the extremely pigmented shades

Sleek Makeup Bronze Block Dark Swatches

Hand swatch of the bronze block

If you’ve tried Sleek products before, you’ll know that their products are super pigmented. This product is no different, with the one swipe packing a whole punch of color. A little goes a long way with this product, I find that the best way to apply it with is with a larger brush and slowly, building on the color as necessary. It took me a few times to get the hang of how to apply it but now that I have I’m completely obsessed and in love!

The formula has a hint of has a hint of shimmer in it, however it doesn’t appear too much when applied on the skin. The Sleek website says that the pink hue can be used alone as a blush, however because of the size of the block I find it hard to apply a single product at once. This doesn’t bother me much though, I love the color achieved when swirling my brush in all four colors together.

Another thing to love about this product is the price tag, it’s $11.49 USD but even with currency conversion and shipping costs it’s a better option than a lot of the other drugstore brands available. Overall if you’re after a gorgeous sun-kissed glow or just radiant skin, this is definitely a product to consider.

Have you tried Sleek Makeup before? 

EDIT: This post has been linked to ‘The Monday Makeup Madness Party’ over at Fabulous and Fun Life. Don’t forget to head over and join in on the fun, it’s a fantastic way to discover new blogs and get your blog out there!

[Review] Maybelline Color Drama Velvet Lip Pencil: Berry Much

maybelline color drama berry much

Maybelline Color Drama Intense Velvet Lip Pencil in Berry Much

My blog feed has been buzzing with reviews, swatches and pictures of the Maybelline Color Drama Velvet lip pencils ever since they were released in Australia. Although they sounded fantastic,  I vowed not to buy one because I really really didn’t need another lipstick in my collection! Luckily for me, I was chosen as one of the M Edition winners and won this lipstick from Maybelline in the shade 310 Very Much.

First impressions, the little pencil looks very cute! The lid fits on perfectly so it would be ideal to travel with. This was my first time trying out a lipstick in a pencil form and I loved the precise application that I got. I’m not sure how annoying sharpening the pencil would be once it gets blunt but for the time being I much prefer the ease of application from this pencil.

The formula of this pencil is smooth, creamy and pigmented. In terms of longevity, after five hours of wear it looks the exact same as it did when I applied it. There’s no feathering, uneven fading or the unattractive dry lips which is a huge plus for me. The only thing which I don’t like too much about this pencil is that I can’t control the color. With some of my lipsticks, I can dab on the color if it’s too intense or dark for my liking but with this it’s straight super dark pigmented color.

Maybelline Color Drama Intense Velvet Lip Pencil berry much

Maybelline Color Drama Intense Velvet Lip Pencil Berry Much

Maybelline Color Drama Intense Velvet Lip Pencils

Maybelline Color Drama Intense Velvet Lip Pencil

Maybelline Color Drama Intense Berry Much hand swatch

Hand Swatch: Maybelline Color Drama Intense Berry Much

Berry Much is extremely bold and intense, even darker than MAC Rebel which is what this color originally reminded me off. The color is perfect for the colder months ahead and is the perfect statement lip if you want a change from red lipstick. I’m dying to try ‘Minimalist’ or “Nude Perfection’ next, once I start buying lip products again that is 😉

The Color Drama lipsticks are available in 10 shades in Australia and retail for $9.95. They regularly go on sale though for 50% off and 3 for 2 so definitely good value for money.

Have you tried any of the Color Drama lip pencils yet? x

[Review] MAC Peachtwist Blush

Review MAC Peachtwist Blush

MAC Peachtwist Blush (Sheertone Shimmer)

Review MAC Peachtwist Blush

MAC Peachtwist: A Golden Tawny Peach blush

Hi everyone! I’m reviewing the MAC peachtwist blush on the blog today, which is my first blush from MAC. MAC describe this blush as a “golden tawny peach (sheertone shimmer)”.

I was first introduced to this blush when I got my makeup done at MAC last year. The blush is in powder form, and the packaging is the standard round packaging with a transparent lid.

The blush is a deep apricot/peach color, with a subtle gold shimmer. I believe that the MAC sheertone blushes are meant to be buildable. On initial application, the blush is sheer with a tiny bit of shimmer in it and brings a subtle glow to the face. From there, you can build up the color intensity to a shade that you like.

I generally shy away from blushes because I’m afraid of looking unnatural or over applying and getting a clown effect, but this blush is easy to work with and highly blendable. MAC products are always highly pigmented so I only need to use the tiniest bit of product on my brush to get my desired look.

Overall, this color seems to work really well on my Indian skin. If you have warm undertones or tanned skin, this gorgeous peachy brown shade is probably going to look gorgeous on you. I’m enjoying the soft peach bronze glow that this blush gives my skin and have a feeling that I’ll be reaching for it a lot in the colder months.

You can find the MAC Peachtwist blush on the MAC website for $41. Thanks for reading! x

Swatch MAC Peachtwist blush

Finger swatch of MAC Peachtwist

Swatch MAC Peachtwist NC 43

Hand swatch: MAC Peachtwist on NC 43 skin

Swatch MAC Peachtwist NC 43

Hand swatch #2: MAC Peachtwist on NC 43 skin

[Review] Rimmel Lasting Finish by Kate Moss lipstick #19

Rimmel Kate Moss #19

Rimmel Kate Moss lipstick #19

Rimmel Kate Moss lipstick shade #19

Rimmel Kate Moss lipstick shade #19 swatch

Hi everyone! Firstly a HUGE apology for the lack of posts on this blog, I’ve been busy with exams and have also started reading again! I finished Gone Girl (Gillian Flynn) and Six Years (Harlan Coben) in the last week, both were absolute page turners which I can’t recommend enough.

I’m reviewing yet another Rimmel lipstick today, this one from the Kate Moss range in shade #19. I’m a huge fan of the Rimmel Kate Moss range, it’s definitely one of the best drugstore ranges available. The lipsticks come in a sturdy, matte black tube and have a faint bubblegum scent.

Shade #19 is a gorgeous nude brown shade with warm pink undertones and is an awesome everyday lipstick. I think that the color would suit all skin tones, and makes a fantastic natural or MLBB color for Indian skin. The color pay off on this lipstick is amazing, the color is super pigmented with just one swipe and lasts a good few hours before wearing off. The lipstick is also creamy and moisturizing, I don’t have to apply lip balm before using it.

The Kate Moss range of lipsticks is available in Australia for $11.95 but regularly goes on sale for 50% off at Chemist Warehouse. 

[Review] MAC Brave lipstick

review MAC brave lipstick

review MAC brave lipstick

MAC Brave lipstick swatched on NC 42 dark skin

Another day, another MAC lipstick!

MAC describes Brave as ‘a muted pink-beige with a very subtle white pearl overtone’. Brave is part of the permanent line and is available in the satin finish. I picked Brave up when I attended one of the MAC Technique sessions. I spent some time deciding between Brave and Twig and eventually went with Brave because it was lighter and more natural.

I know that a lot of people find that Brave is their perfect nude and ‘my lips but better’ shade, but on my NC 42 skin, it looks more pink and not nude at all. I’m a huge fan of the satin finish, they feel comfortable on the lips without drying them out. This lipstick lasts around 3 to 4 hours on, without eating or drinking.

Brave is a gorgeous pink shade which I think works better on fair to medium skin tones. If you’re NC 40 and up, I suggest trying it on first because it can make some skin tones looked washed out.

MAC Brave is available from the MAC online store and Myer for $36 in Australia.

MAC Technique: All Out Fabulous

You get bloggers who go to events and are home with a post up within a few hours and then you get me, who goes to an event, takes pictures and then blogs about it four months later 🙂 I’ve really been wanting to share my MAC Technique experience, especially because I attended the 60 minute MAC makeover prior to that so had something to compare the class to.

From the MAC website:

MAC Technique- Artists reveal their tips and techniques in workshops for all ages, all races, all sexes. Minimum 8 guests. $120

MAC Techniques

MAC Techniques haul

I booked for the class about a month in advance, because I was told that the classes are sometimes booked out early. I had to pay the full amount upfront which would be redeemable for products on the day.

The event started at 5.30 pm, after store hours, and we arrived to see a table out for us, complete with snacks and water. Each seat had a file which detailed some key looks and had space to make notes. There were around 12 girls who attended the class, and 6 MAC artists present.

The first hour and a half of the workshop was watching two MAC artists creating their all out fabulous looks on models. We could ask questions in between, and they passed around products as they used it so we could get a look and feel of what they were using.

MAC Techniques

MAC artist creating a Melbourne Cup look on her model

MAC Techniques

Melbourne Cup look created by the second MAC artist

MAC Techniques

Finished look! The girls were more than happy for us to take pictures to recreate the look later.

In the second part of the workshop, we were into groups (roughly two girls to one makeup artist). We could experiment with looks, play with the makeup, ask for help from the artists and decide on the products we wanted to buy. The last part went REALLY fast, with everyone testing products and talking and paying for their products.

Overall thoughts

MAC Techniques is a fun way of learning about MAC products, and it was awesome getting to play around with MAC products after hours. In terms of teaching you how to apply makeup, I found it difficult to follow two artists at once and also felt that it was more a demonstration of how to use some MAC products. I enjoyed the class and the girls were lovely but I probably wouldn’t attend one again. I’ll be more likely to do the MAC makeover again (read about my experience here) because I loved the one on one attention, and that products recommended was customized to my skin shade and preferences.

My haul 🙂

MAC Techniques haul

MAC Techniques haul

MAC Techniques haul

MAC Techniques haul: Studio Fix foundation, Studio Fix powder & MAC lipstick in ‘Brave’

Have you attended a MAC class before? Would love to hear your thoughts! x

My MAC makeup appointment

A friend of mine got married recently so I decided to mix things up a bit and get my makeup professionally done at a counter. Most makeup counters are happy to give you a makeover if you purchase some of their products. I’ve had a mini makeover at the Benefit counter before and also at The Body Shop, but I chose MAC because I was already interested in buying the MAC studio fix foundation and a MAC nude lipstick.

Because the wedding was on a Saturday, I went in to Myer about three weeks before and made an appointment. Even though I thought I was booking really early, a lot of the sessions were already booked! I had to pay the full amount for my appointment upfront and they kept the receipt in their appointment book as proof of payment.

On the day of my appointment, I arrived around 10 minutes earlier than my appointment and had time to play around and test some of the cosmetics. I also didn’t wear any makeup because it was just going to be taken off anyway. I had my makeup done by the lovely Elona, who walked me through the kind of look I wanted, the colors I wanted to use and what the makeup was for. I had a general idea of the look I wanted: smokey eyes, nude lip and glowing skin with some contouring and highlighting. I really liked that Elona showed me every product she was going to use on me, and explained what it was for and how to apply it. She also included me when choosing the eye shadow, foundation and blush color so I didn’t end up with something I didn’t like. I had mentioned to her at the beginning of my appointment that I was interested in the Studio Fix Fluid so she used that on me.

After the appointment, she drew up my face chart so I could recreate the look at home, and products I wanted were redeemed against my appointment receipt. The appointment lasted for just over an hour and was $95 (redeemable in MAC products).

MAC face chart

MAC face chart

Tips for getting your makeup done at MAC

  • Book your appointment in advance.
  • Have an idea of the look you’re after. Take pictures to make explaining your look easier.
  • Don’t be afraid to tell the makeup artist what you like and dislike..it’s your appointment after all 🙂
  • Before your appointment, do a quick calculation of the products you’d like to buy and the cost to avoid spending too much on the day.
  • MAC artists are only allowed to apply MAC lashes on you. The cost of the lashes can be deducted from the $95.

Completed MAC look

Products I purchased from my appointment are listed below:

  • MAC Studio Fix Fluid
  • MAC lipstick in Hug Me (reviewed here)
  • MAC lashes

Getting my makeup done at MAC was super fun and I would definitely recommend it if you have a special occasion to attend.

Have you got your makeup done professionally before? Would love to hear your experiences!

Fatima x